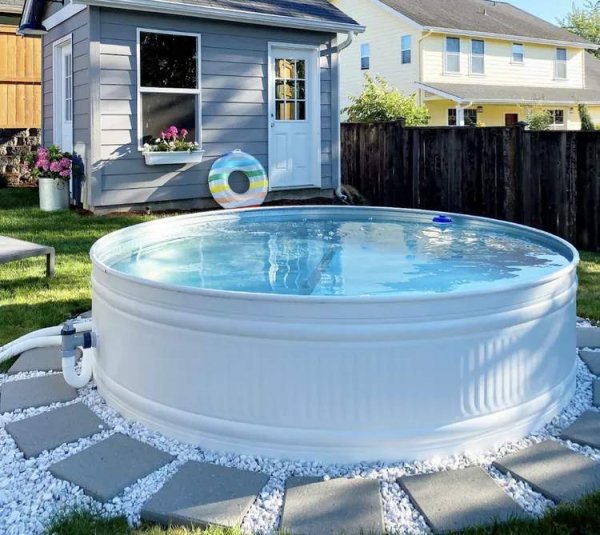
Build a Backyard Stock Tank Pool: Step-by-Step Setup
For homeowners seeking an affordable, low-commitment alternative to an in-ground pool, a stock tank pool offers a practical solution. These compact pools, made from galvanized metal or plastic tanks originally designed for livestock watering, can be assembled in a weekend with basic tools and a filter pump. The total cost typically lands around $500, depending on tank size and pump choice, making it a budget-friendly entry into pool ownership.
The key to a successful stock tank pool lies in careful planning. Before purchasing, consider the tank's dimensions and material. For those who want to stretch out, an oval tank at least 8 feet in diameter is recommended, while circular tanks accommodate more people seated. Depth should allow shoulders to be submerged while sitting, generally 26 to 28 inches. Plastic tanks are lighter and resist corrosion, but metal tanks withstand sun exposure without becoming brittle.
Placement is equally critical. The ground must be level and stable, away from runoff that could undermine the pool. Once filled, a 300-gallon tank holds roughly 2,500 pounds of water, exerting over 100 pounds per square foot on a 24-square-foot footprint—far exceeding the load capacity of most decks and roofs. Never install on an elevated structure.
Step-by-Step Installation
Begin by leveling the ground, digging down high spots and filling low ones with dirt or gravel, then tamping to prevent settling. Run an extension cord from an outdoor outlet to power the pump, ensuring the path is free of trip hazards.
Before drilling any holes, water-test the tank. Fill it completely and inspect the seams for leaks. If leaks appear, apply silicone from the inside so water pressure reinforces the seal. Next, mark the waterline and drill openings for the skimmer and return line. For a hose-fitting skimmer, drill holes slightly below the waterline. For a real skimmer, trace its mouth, drill corner holes, and cut out the opening with tin snips.
Install hose fittings into the drilled holes, applying silicone for a watertight seal. Attach the filter pump—an all-in-one unit with a cartridge and circulation pump—connecting the inlet to the skimmer and the outlet to the return hole, securing all connections with hose clamps.
Fill the tank with a garden hose, watching for leaks at patched areas and drilled holes. Once full, start the pump and check again for leaks under pressure. If any appear, turn off the pump, drain below the leak, and seal with silicone or a hose clamp.
Water Chemistry and Ongoing Care
After the pool is running, test the water to establish a baseline, as some tank finishes can alter pH. Add pool shock or chlorine tablets in small increments, running the pump for a few hours between additions, until chlorine levels reach 3 to 4 parts per million. Adjust pH, alkalinity, and calcium as needed for long-term maintenance.
Routine upkeep mirrors that of any pool but with smaller chemical quantities. Test water weekly and run the filter pump at least eight hours daily, especially in sunny locations. Regularly inspect all connections for leaks, as corrosion from drips can shorten the pool's lifespan. In colder months, disassemble the pump, drain the tank, and store it indoors or under a deck—a simple process that encourages year-round care.
Stock tank pools are not without risks, as they repurpose equipment not designed for human use. However, with proper setup, they offer a safe, affordable way to enjoy summer swimming without major yard construction.
Build a Backyard Stock Tank Pool: Step-by-Step Setup
Transform a galvanized or plastic stock tank into a functional backyard pool with a filter pump and proper chemical balance. This guide covers tank selection, placement, installation, and maintenance, with a focus on safety and longevity.
Leave a Comment
Comments (0)